New to composting? You may have heard about the magical fertilizing power of worm castings, but what ARE worm castings and what do they do?

In short, worm castings are nutrient rich worm waste (aka poo) resulting from the breakdown of organic matter, most notably via vermicomposting.
We’ll cover everything you ever wanted to know about worm castings, plus how to properly use them.
Jump Ahead To...
What Are Worm Castings?
Like previously stated, worm castings are basically nutrient rich worm fecal material. Worms digest all sorts of organic material that result in castings. They especially love vegetable and plant matter, manure and other animal waste, soil and compost.
Worm castings are naturally produced by all worm varieties in nature, but castings may also be created via vermicomposting. Some larger scale worm farms and facilities also produce worm castings to sell.
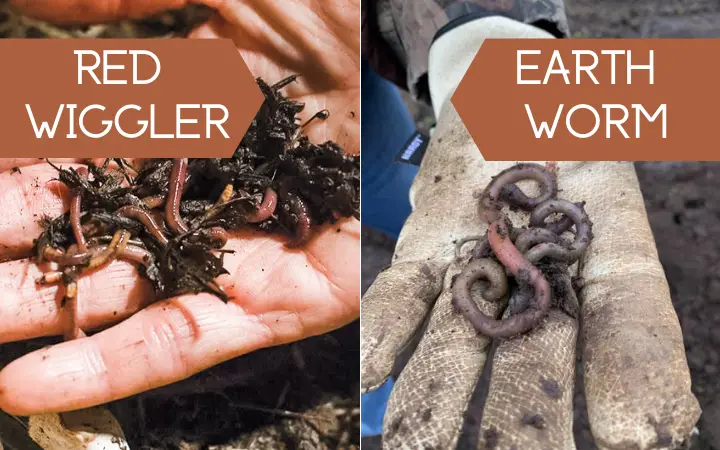
Before we go any further, it’s important to note that only a certain type of worm is best for vermicomposting at home. Hint, it’s not the famous Earthworm.
Red wigglers are actually the secret to composting at home. More on that in just a bit.
Related: 16 Methods of Composting At Home (for any budget or space)
Worm castings act as a natural, organic soil fertilizer that’s perfect for nourishing plants, without causing any root damage.
Some commercial fertilizers and even natural fertilizers can burn plant roots. Fertilizer burn happens when plants receive more fertilizer than they can process.
It may also occur because chemically produced fertilizers and some types of composts (specifically bokashi compost) sometimes need to be further broken down in the soil before plants can absorb the nutrients.
On the other hand, worm castings are completely broken down. Therefore, they’re a ready-to-use soil fertilizer.
What are Worm Castings Made of?
Worm waste is composed of nutrients that plants love like:
- nitrates
- phosphorus
- magnesium
- potassium
- calcium
- manganese
- copper
- zinc
- cobalt
- borax
- iron
- carbon
- nitrogen
Worm castings aren’t smelly like typical animal waste you may be thinking of. Instead, it smells just like moist, fresh dirt.
Benefits of Worm Castings
Worm castings fertilize the soil, but they also have many more benefits for both soil and plants. (source)
Soil Benefits
- provides structure
- increases water retention
- enhances soil aeration
- stabilizes soil nutrients
- feeds soil microorganisms
Plant Benefits
- prevents root burn
- enhances seed germination
- protects from disease and pests
- increases plant growth
- speeds up flower and fruit production
To summarize, you definitely want worms in your garden! Or at least worm castings in your potted plants!
Earthworm vs Red Wiggler Worm Castings– What’s the Difference?

Castings from earthworms and red wigglers are both important for soil and plant health. Both their castings produce the same soil and plant benefits for the most part, but the two worms have entirely different functions.
Red wigglers are best for composting scraps, while earthworms primarily consume soil. Earthworms also aerate dirt as they crawl deep into the ground, which is important for plant growth.
Red wigglers are a type of earthworm, so it’s easy to confuse them. A full comparison of earthworms and red wigglers is found below.
| Earth Worms | Red Wigglers |
|---|---|
| reddish brown in color, larger | red-purplish hue, smaller |
| consumes primarily soil | consumes food/organic waste |
| burrows up to six feet | hangs closer to surface |
| prefers cool temperatures | can tolerate some warmth |
In summary, red wigglers are best suited for compost bins. A pound of these worms will consume about half a pound of food per day.
Red wigglers are also the optimal composting choice because of their higher heat tolerance. Heat is produced as organic material is broken down, which cause earthworms to burrow underground. On the other hand, red wigglers tend to hang around the surface to munch on organic waste.
How to Make Worm Castings with Vermicomposting

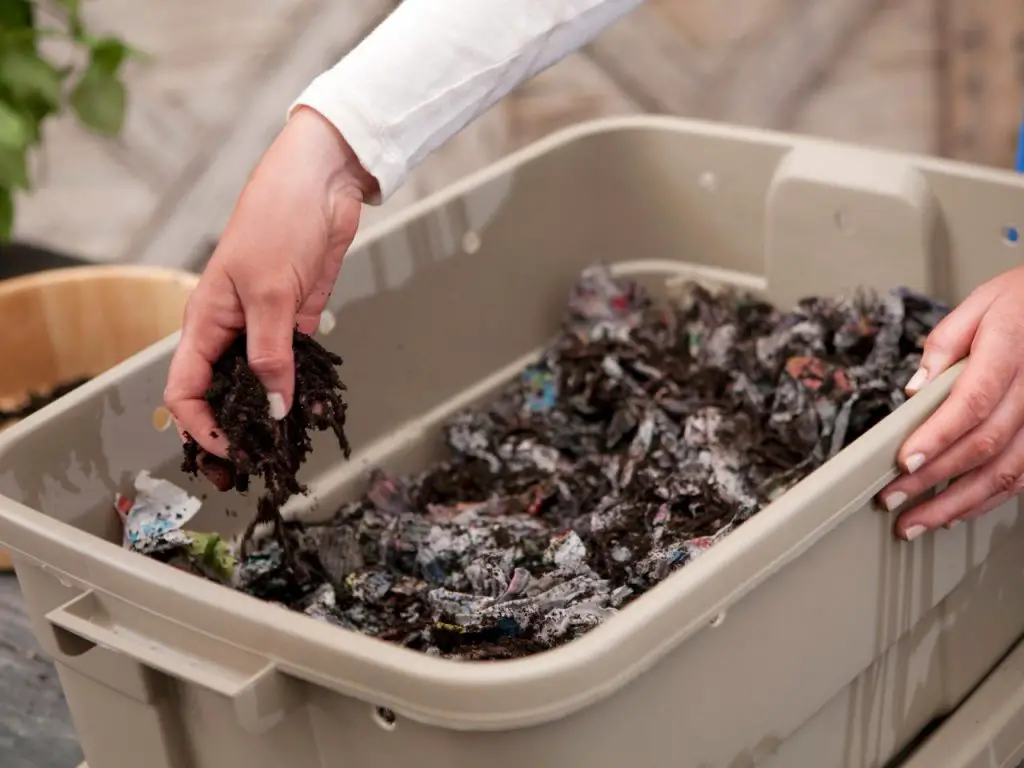
Vermicomposting is one of the best ways to compost indoors or in small spaces. Simply put, it means composting with red wigglers to break down organic waste.
It not only keeps food and other waste out of landfills, but the end result is compost in the form of worm castings!
Follow these seven steps to make worm castings via vermicomposting. You’ll have castings in about three to six months.
- Assemble or purchase a worm bin. DIY instructions can be found here.
- Purchase about 1 pound of red wiggler worms. Buy less if you have a smaller amount of food waste, because worms multiply very quickly!
- Prep the bin and add bedding like soil, finished compost, manure, or shredded and damp carbon material (like paper or cardboard).
- Next, introduce a few more microbes with food waste, but don’t overdo it. The bin should contain 2-4x more brown material than green.
- Add worms and store in a cool, dark, and ventilated area. Give the worms about a week to adjust to their new home before adding more waste.
- After one week, begin feeding worms every two to three days with food and other waste. Ensure the bin remains damp with plenty of air flow.
- Rinse, repeat, and harvest worm waste after about three months!
Consider buying a vermicomposting kit for simplicity’s sake:
How to Harvest Worm Castings
Harvesting worm waste is quite simple, and there are several different ways to do it. Try capturing castings by using one of these:
Migration Method
The easiest and most recommended method is to migrate all worms to one side of of the bin. Add food and other organic materials to only half the bin.
Eventually the worms realize where their food is, and will all move to that side of the bin. Then, scoop the worm castings left behind from the other side.
If using a multi-level vermicomposting system, simply start adding food to the upper level. Worms will all move up, leaving only castings in the lower tray.
Light Relocation
This method is messier, but still relatively easy. Worms prefer a cool, damp, and dark environment. When light is introduced, they automatically begin to move away.
Dump out worm bin contents onto a flat surface in a well lit area. Pretend it’s sand and build mounds with the castings. Worms will quickly travel inward toward the mound’s lower half to escape the light.
Then, scrape the castings off the tops and sides. Put the remaining contents back into the bin and continue adding food scraps and carbon rich materials.
Hand Sorting
Skip this method if handling worms or sifting through their poo sound less than appealing. It’s also time consuming, unless you just need a handful of worm castings here and there.
Dump out the worm bin contents, and then pick out the worms by hand. Return the wigglers to the bin with fresh bedding and food scraps. Now you’re left with just a pile of castings, ready for the garden or plant pots!
Where to Buy Worm Castings
There’s always the option to buy worm castings if making your own isn’t an option. Most home improvement stores, nurseries, and garden supply stores carry castings. Many options can be found online as well.
Or if you’re really lucky, score worm poo from a neighbor or community compost center for free! You never know what you’ll find in a Buy Nothing Group these days.
Buy or source worm castings from these locations:
- Home Depot
- Lowe’s
- Tractor Supply Company
- Amazon
- Etsy
- Uncle Jim’s Worm Farm
- local worm farm
- Buy Nothing Groups
- community composting center
Shelf Life of Worm Castings + How to Store Them
Castings should be used sooner than later (preferably within six months) to reap the microbial and bacteria benefits for soil. Some sources say microbes can live up to three-10 years after harvested if stored properly.
How to Store Worm Castings
Store worm castings at 60-80 degrees Fahrenheit in an aerated, dark, environment. Too much exposure to UV light can deactivate some beneficial properties.
A five gallon bucket with a lid is optimal, but be sure to drill holes around the top for airflow. If castings become too dry, just revive it with a spritz or two of dechlorinated water.
Never store vermicompost in the freezer, because freezing will kill the microbes and cause the organic matter to come dormant.
If in doubt, sniff it. Worm castings should smell like fresh dirt. Any odors or sour smell could mean anaerobic bacteria has begun to grow. (Usually that’s only the case when there’s no oxygen flow).
If worm castings have gone ‘bad,’ they can still find use as a soil amendment, even if the good microbes aren’t active anymore. Expired castings may still provide structure, porosity, and some nutrient content to depleted soil.
Uses for Worm Castings
What are worm castings used for? Worm poo has loads of uses, whether you’re a master gardener or just an amateur houseplant parent. The most common uses include:
Fertilizer
Worm castings are one of nature’s most effective fertilizers. It’s immediately ready-to-use and plants can absorb the nutrients quickly.
According to some sources, worm waste provides enough organic plant nutrients to feed a 6″ potted plant for more than two months.
Potting Mix
Mix worm castings with potting soil mix in a 1:3 ratio for a nutrient rich environment for seeds to flourish. Add seeds and water, and watch plant growth take off.
You’ll grow healthy and hardy plants in no time!
General Planting
Castings are a great addition for all types of planting purposes. Put your castings to use following these directions from a reputable organic worm castings supplier:
Vegetables or Annual Plants: Line planting holes and seed furrows liberally with earthworm castings. Set plants or seeds to proper depth and cover with garden soil, then water well.
Sprinkle castings on soil surface monthly during growing season with ½ cup per plant or 1 cup per linear foot of planting row. Water as needed.
Perennials: Work ½ cup or 1” of castings into surface of soil above root zone in early spring and summer. Repeat in early fall. Water as needed.
New Shrubs, Berries, and/or Bushes: Lay a mixture of one part castings to three parts garden soil (1:3) at the base where plant will be placed. Sit roots on the worm casting mixture and fill the remaining hole with garden soil. Water well.
Mix 1” of castings into ground surface above root zone during following growing season in spring, summer, and fall. Water as needed.
Established Shrubs, Berries and/or Bushes: Combine four cups of castings into soil at a depth of 2” to 3” below the surface in both early spring/fall. Water as needed.
Soil Amendment
Worm castings do wonders for depleted soil. Before adding new plants to spent garden soil, replenish nutrients and microorganisms by adding 1 part worm castings to 3 parts soil.
Mix together and add seeds or plants according to supplier recommendations. Water well.
New or Established Lawns
Help new grass grow quicker by sprinkling 10 pounds per 100 square feet of lawn space before of after adding grass seeds. Gently scratch up the ground to mix, and water as needed.
Established lawns can benefit too! Apply a thin layer of worm castings over the lawn and water as needed. (10 pounds per 100 square feet is typically recommended)
Compost Piles
The concentrated microbes found in worm castings can help speed up other compost piles. Add a layer of castings to traditional piles and bins when adding a layer of greens or browns. Turn and water as needed.
Worm Tea
Finally, what else are worm castings good for? Worm tea! Just don’t attempt to consume it.
Make a microbial cocktail that plants will love! See full details and instructions below.
Worm Castings Tea
Worm tea is an ultra concentrated liquid fertilizer made by steeping worm castings in unchlorinated water (like rainwater or distilled water). This potent organic fertilizer is typically used to boost microbiological activity in soil by adding in bacteria, fungi, and protozoa.
Some people dilute the tea with 50% water for larger gardens or multiple houseplants.
How to Make Worm Casting Tea from Vermicompost
- Construct a makeshift ‘tea bag’ from an old t-shirt, pantyhose, or cheesecloth strainer. Cut it into a large enough square to tie up a pound or two of vermicompost.
- Add a couple of pounds of red wiggler worm castings to the tea bag.
- Soak in a bucket full of unchlorinated rain water overnight. (Avoid using chlorinated water because it kills good bacteria.)
- Remove the worm tea bag and strain liquid into a watering can. Dilute with 50% water if covering a large garden or area.
- Water your plants as soon as possible because the organic microbes die off quickly.
- Finally, don’t forget to add the worm castings to your garden soil or place them back in the worm bin.
Don’t have the time or patience to make your own worm tea? Check your community for worm farmers. Sometimes they make and sell worm tea if there’s a demand.
Alternatively, worm tea can be found in some farm and gardening stores and definitely online!
Final Thoughts on Worm Castings
You really can’t go wrong with using worm castings in the garden or in potting soil for houseplants. It’s one of nature’s most effective, natural fertilizers and plants thrive when it’s added to nearby soil.
It’s a fully decomposed and ready to use type of compost, and it also won’t harm plant roots like some commercial fertilizers are capable of.
Bottom line, whether you produce it via a worm farm or buy it retail, your soil and plants will be happy and nourished!

This page contains affiliate links, which means I earn a commission if you use them, at no extra cost to you. I only recommend products I actually use and trust. Please see my privacy and disclosure policy for details.

Leave a Reply